$9.95
 Fused Silver Stud Earrings DIY Tutorial
 Subtotal: $9.95

Subtotal: $9.95


Showing 33–48 of 51 results
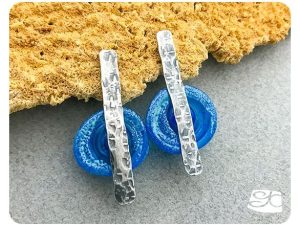
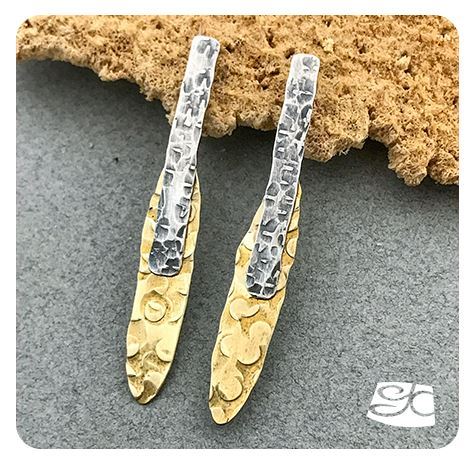
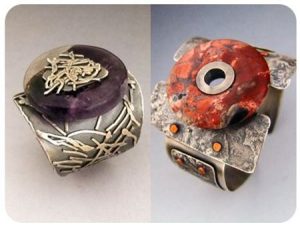
In this tutorial, we will be making a wonderful very versatile set of stud earrings, made with lots of interchangeable parts to play with!.
This pair was designed in a way that permits the wearer to play mix-and-match with 5 different metal components.
And as I love lampwork disk-type beads, you can add some of those to the mix as well!.
They will add a lovely pop of color around the face.
You will be able to assemble an all metal earring set or a metal and glass one to match your outfit or mood.
Combine metals, texture and colored glass to make unique one of-a-kind earrings.
Fusing is a technique commonly used while working with fine silver in
the making of woven ring chains and granulation. It can also be a very
useful way to recycle sterling silver scraps.
Fusing requires a good eye and some experience in the use of a
torch.
The main reason for this project is to give you confidence to go on to a
bigger project. After fusing some scrap wire to a couple of small silver
disks, you will have the confidence to fuse a ring or pendant.
This tutorial is an instant downloading PDF file, it has 7 pages, 19 photos, a template and plenty of tips. The tutorial is for beginners and intermediate students.
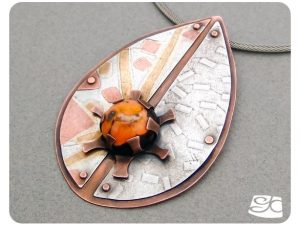
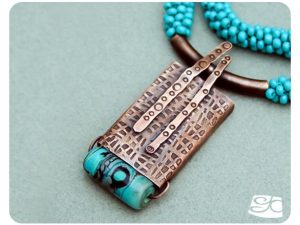
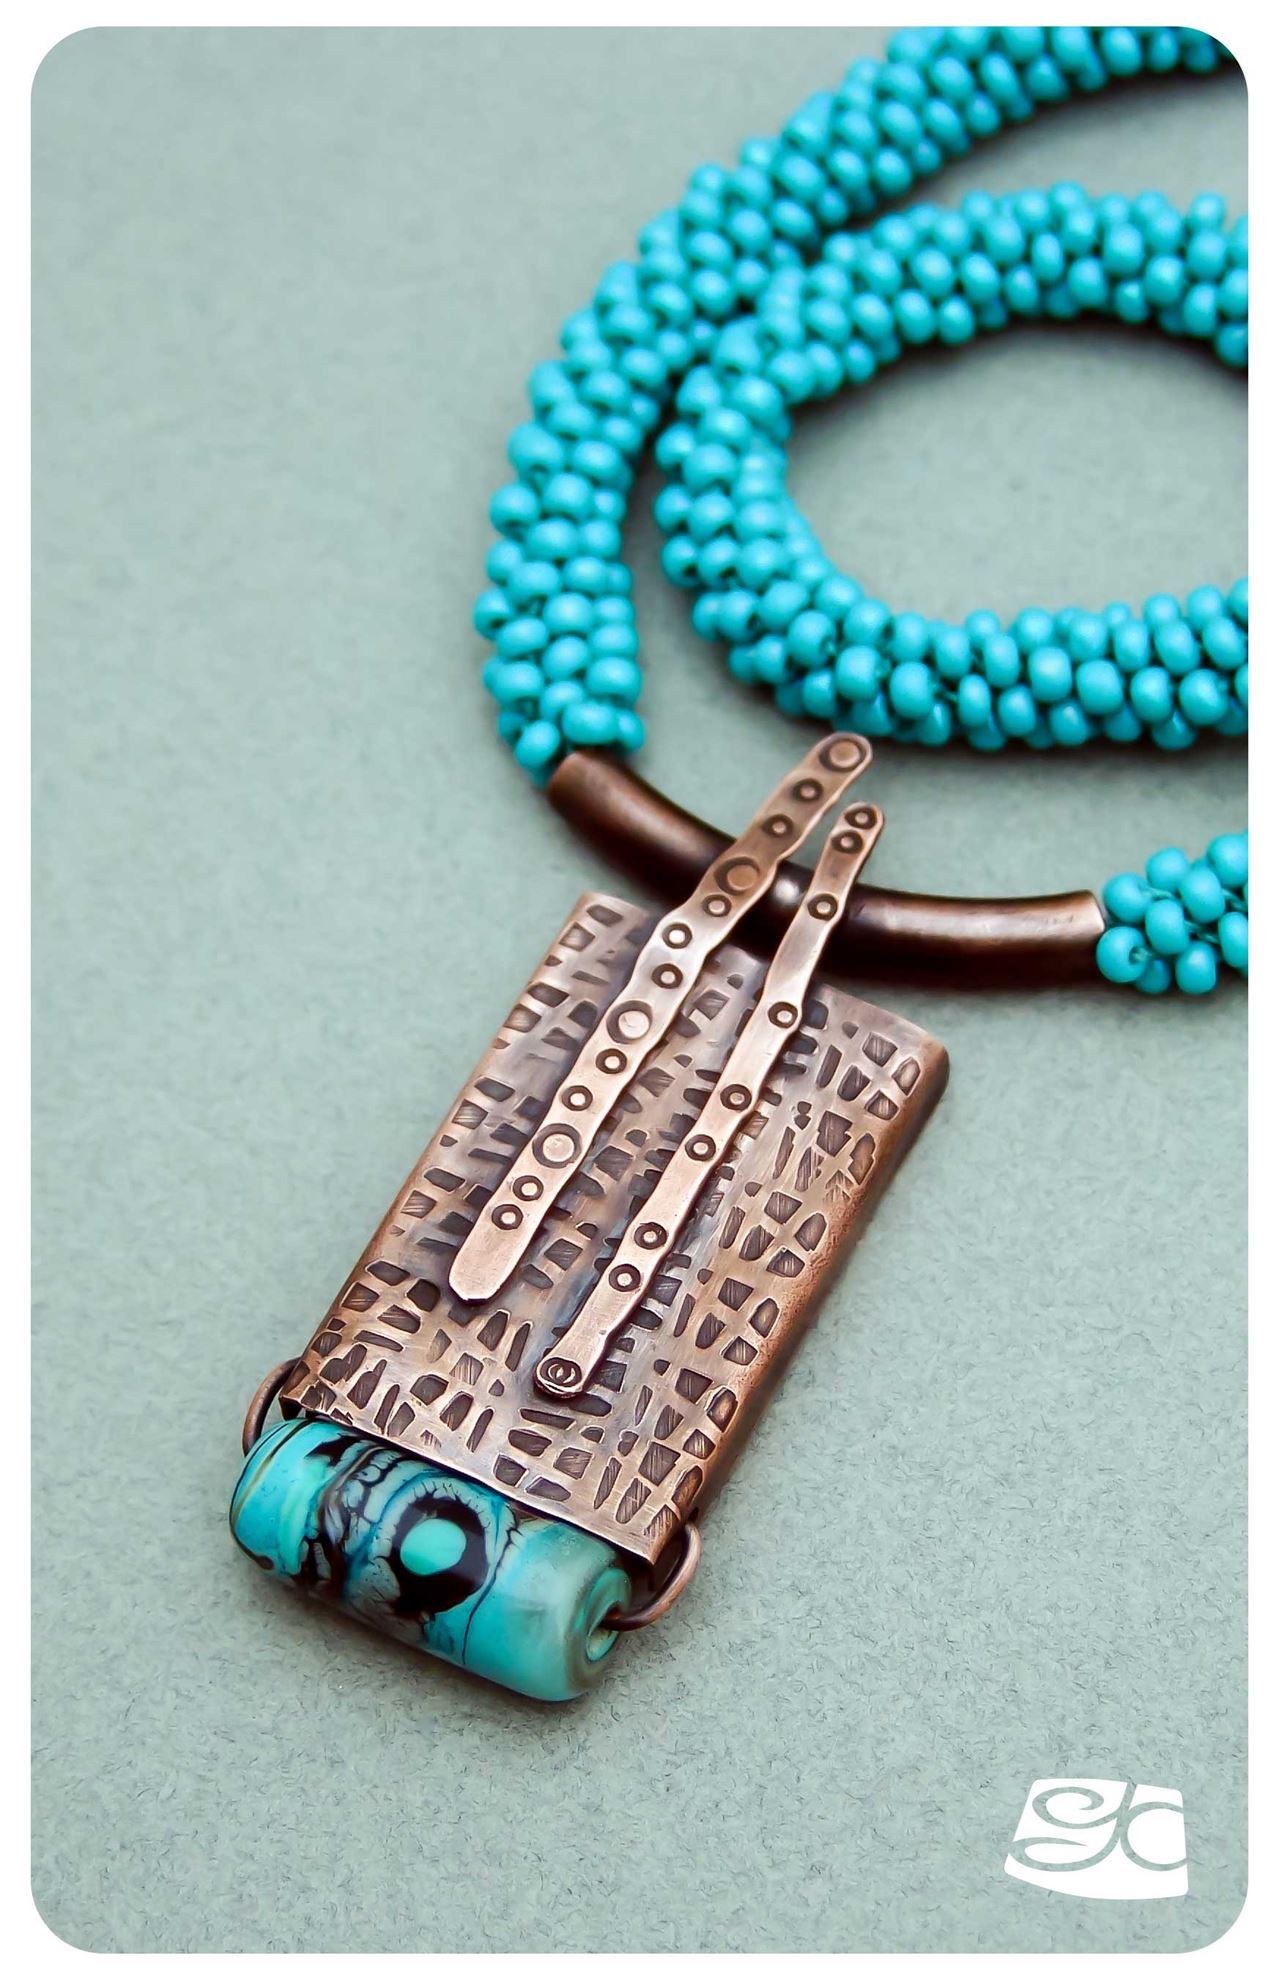
Fusing for lamination inlay is an advanced metal working technique that requires good torch control.
This pendant has one metal fused lamination inlay piece and a rolled milled textured one.
For the fused piece, the substrate is sterling silver and the smaller colored pieces are copper and brass.
The roll milled piece is sterling silver.
For the focal piece, I chose a tab-set lampwork glass cabochon. The pendant was totally assembled with rivets.
The tutorial is an instant downloading PDF file, it has 11 pages, 30 photos, a life size template of all the components and plenty of tips !
For intermediate-advanced skill students.
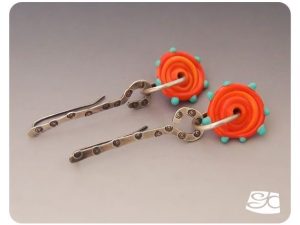
Stamping offers an infinite array of options to decorate metal. You can buy or make your own stamps.
This is a simple project that involves shaping, forging and stamping wire to make a keyhole component.
These components are very versatile, they can be combined to make charms, chains and other decorative elements for earrings and bracelets.
This tutorial is an instant downloading PDF file, it has 7 pages, 16 photos, a template and plenty of tips. The tutorial is for beginners and intermediate students.
Beautiful setting for a pillow bead. It can be strung on a chain as described
in the project. With the addition of a couple of jump rings it
can be worn on a neck wire.
In this project we will use another “cold connection” to attach the pillow
bead to the metal base.
This connecting element is called a “tab”. This type of setting can
work for other bead shapes as well.
The tutorial is an instant downloading PDF file, it has 6 pages, 17 photos, a life size template of all the components and plenty of tips! For beginner skill students.
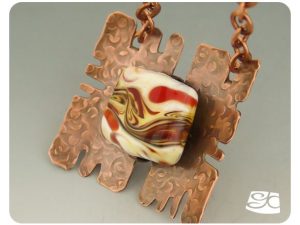
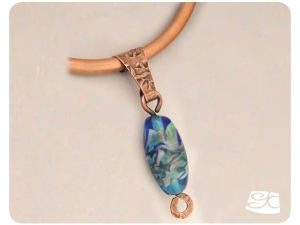
Having jewelry that lets you change the focal part of the piece according
to your mood or wardrobe is a very good thing. When you are a
bead maker, you have many options to choose from, and you can create
more as inspiration strikes you.
Need something purple and blue to go with that dress? Make a new
bead and put it on the pendant. You’ll have the perfect complement
for your dress!
This pendant can be made as a stand-alone piece. It can be worn on
a simple neck wire, a Viking knit chain or a rubber/leather necklace.
The tutorial is an instant downloading PDF file, it has 7 pages, 21 photos, a life size template of all the components and plenty of tips! For intermediate to advanced skill students.
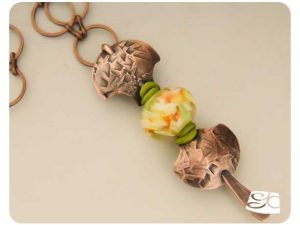
Here we have another simple, easy and elegant pendant setting.
It works specially well for long beads, but it can also be used for a set
of 2-3 medium sized beads.
If you want to customize the setting, you can change the shape of the
fan for another one. It can be a triangle, a square or an oval.
The texture on the metal can also be changed to make each pendant
unique.
The tutorial is an instant downloading PDF file, it has 6 pages, 13 photos, a life size template of all the components and plenty of tips!
For beginner skill students.
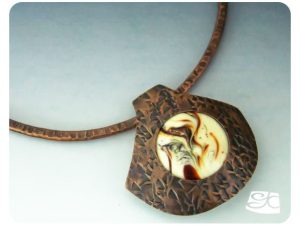
Another very simple, easy no-solder pendant.
This is a project for those not so big beads that came out amazing and
you want to use as focal elements.
The fan shape gives the pendant an oriental feel.
It can be used on a long chain as seen in the photo, or it can be worn
on a neck wire closer to the face.
The tutorial is an instant downloading PDF file, it has 5 pages, 15 photos, a life size template of all the components and plenty of tips! For beginner skill students.
Etching is a process in which a metal is exposed to a corrosive solution
that eats away the surface of the metal. If a design is made on the
surface of the metal with a material that is impervious to the corroding
action, the design will be in relief over the corroded surface not protected
by the “resist”.
The most commonly used etching chemical for steel, copper and brass
is ferric chloride.
The tutorial is an instant downloading PDF file, it has 6 pages, 14 photos, a life size template of all the components and plenty of tips! For beginner skill students.
This is the first of a set of simple pendants that involve no soldering.
This particular setting is a curled-over bail that lets you exchange the
pendant piece.
You can mount a variety of beads on these heavy gauge head pins to
use with the same bail.
The tutorial is an instant downloading PDF file, it has 5 pages, 13 photos, a life size template of all the components and plenty of tips! For beginner skill students.
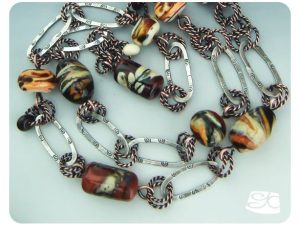
I had a collection of earth-tone “one-of-a-kind” beads, better known
as the ”orphans”.
Each of the beads has some interesting detail that I loved and could
not bear to part with.
I always had the idea of using all of the beads together in a long chain
necklace.
As the beads were big, the chain links had to be big too.
The organic shapes of the forged and stamped thicker gauge oval links, in
sterling silver, went well with the large beads.
The twisted copper wire jump rings added color and textural interest
to the metal components of the chain.
The tutorial is an instant downloading PDF file, it has 6 pages, 18 photos, a life size template of all the components and plenty of tips! For beginner skill students.
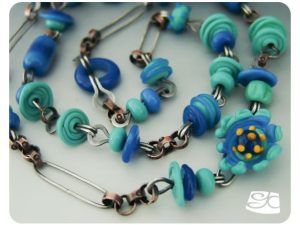
Turquoise and blue is one of my favorite color combos.
Since I have lots of beads in this color palette, they were perfect for a
long chain. I got to use 37 of my beads.
A large amount of silver went into the making of the links. Feel free to
use copper instead of silver for the larger ovals and bead links.
This necklace is 104 cm long (43”) and can easily be worn double with
the use of an “S” clasp.
The mix of different shaped beads draws the eye to go all the way
around the necklace.
The tutorial is an instant downloading PDF file, it has 9 pages, 25 photos, a life size template of all the components and plenty of tips! For beginner skill students.
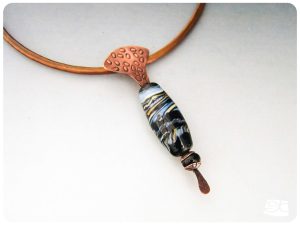
Most of the time cylindrical beads incorporated into a pendant, are set to hang vertically from a bail.
I thought it would be fun to do a horizontal setting for a change.
The bead is set at the bottom of the pendant and is free to move so you can enjoy every side.
The texture on the pendant is the result of a handmade steel stamp, using the design in closely placed rows.
This project includes a bonus mini-tutorial on how to make your own hand-cut stamps.
The pendant can be worn on a plain neck cable, a silk ribbon, or a chain.
But it looks especially well threaded onto a beaded Kumihimo cord made with matching glass beads.
The tutorial is an instant downloading PDF file, it has 11 pages, 23 photos, a life size template of all the components, plenty of tips and a Bonus Mini-Tutorial !
For beginner skill students.
An anticlastic shape is one that curves around two axes, the best example of this shape is the surface of a saddle. Anticlastic shapes are structurally rigid but light weighed pieces, making them ideal for jewelry making.
This project will introduce you to anticlastic raising, which tools you need and how to use them to shape a beautiful one-of-a-kind ring.
The wide adjustable band of the ring shank is perfect for stamping or hammering lots of texture!
You can make the ring in Silver or copper, copper looks special good with green stones.
The use of a calibrated stone and pre-made commercial bezel cup makes this a good beginner’s soldering project.
This was a best selling metalworking class at the Bead & Button show.
The small anticlastic stake and mallet combo, the soldering locking head & shank tweezers, calibrated cabochons & bezel cups used in this tutorial are available for purchase in the tools & materials area of the website.
This tutorial is an instant downloading PDF file. it is 8 pages long and has 19 photos.
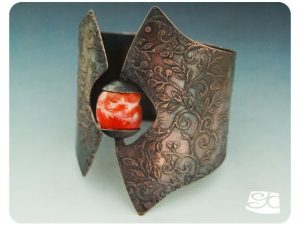
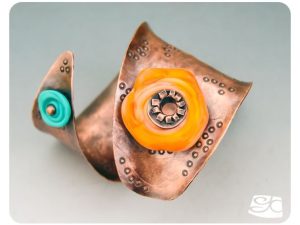
Anticlastic Raising is a way of shaping metal, curving it into different
directions like the shape of a horse’s saddle.
The shapes obtained with this method are very organic and beautiful.
They are also very strong; this means that thinner gauge metal can be
used to make lighter pieces.
Our cuff will be shaped into an asymmetric anticlastic spiral.
With one large lampwork wavy disk on the wide side, and a small disk
in a contrasting color on the narrow side.
The tutorial is an instant downloading PDF file, it has 8 pages, 16 photos, a life size template of all the components and plenty of tips! For intermediate skill students.
Gemstone donuts are beautiful and always catch you eye at bead
shows. But, when you get home, you don’t know what to do with
them, so they get stashed in a box or drawer for “later”.
This project incorporates one of these smaller donuts into a simple,
but dramatic piece of jewelry.
Fused silver has a very attractive organic, one-of-a-kind look, making
it the perfect element for a unique piece of jewelry.
If you have not tried fusion before, this is a small project perfect to try
your hand at without risking a lot of material.
The tutorial is an instant downloading PDF file, it has 8 pages, 18 photos, a life size template of all the components and plenty of tips!
For intermediate skill students.